


Modern bathrooms are much more than just modern fittings and eye–pleasing furniture; to achieve the full effect, you need an elegant heater. The days when cast iron radiators were making our interiors ugly have long since been over. Our wide range of bathroom heating rails allows you to diversify the bathroom interior and satisfy your practical needs, such as the need to dry your underwear or towels. Commercial valve systems make it possible to connect heating devices to central heating by making a standard (water–type) or water and electricity connection. It is possible to make an electrical connection with a closed cycle (in case there is no central heating).
According to the best installation practices, general principles of proceeding with installation of bathroom heaters include:
- checking every component you need, e.g. valves, valve adapters, connector supports, fastening bolts, vents;
- preparing tools: tape measure, pencil, adjustable spanner, Rothenberger Uni spanner, hammer drill, screwdriver;
- adhering to manufacturer recommendations included in installation instructions.
If these rules are followed, the heaters will work effectively, providing even circulation of warm air inside your room. If there is a need to move a heater onto an internal wall, its selected power has to be 10% greater than the designed power. In such a case we also recommend that you hang an additional shield above the heater, e.g. a shelf, to prevent the wall from becoming dirty from the air flowing above the heater. An additional reinforcing frame is to be designed at the place of fixing onto an internal drywall to hold the weight of the heating device, including water. In order not to lose the heat output of radiators, fitters should maintain an appropriate distance from the floor and the windowsill (given in installation instructions) during their installation. Each heater is connected to the central heating system with two pipes: a supply pipe, which supplies hot water to the heater from a heat source (boiler, water jacket fireplace) and a return pipe, circulating cooled water back to the system. Depending on the type of heating device and method of pipe guiding, a bottom or side connection is used.
Bottom connection. In this option, both pipes are connected to the fitting on the bottom side of the heater next to the right or left edge by means of special sets equipped with shut–off valves. This allows both valves to be closed (to stop water supply and outflow) without the need to drain water from the heating system, e.g. in case of a failure. A straight set is used for pipes directly coming out of the floor, whereas an angle set is used for pipes coming out of the wall under the radiator. The first solution is easier to install but it will make floor laying harder (you will need to cut floor panels, floorboards, or terracotta tiles in this area properly).
Choosing the heater
Option 1: a ready system, lines are guided out and the distance between them is set (e.g. leftover from a previous radiator). You are forced to choose a heater with the same connector spacing (which is not the same as total width!).
Option 2: building an installation from scratch or rebuilding an old one (walls have to be chiselled). In this situation, the comfort of choosing a given model is not limited by the distance between hydraulic connectors.
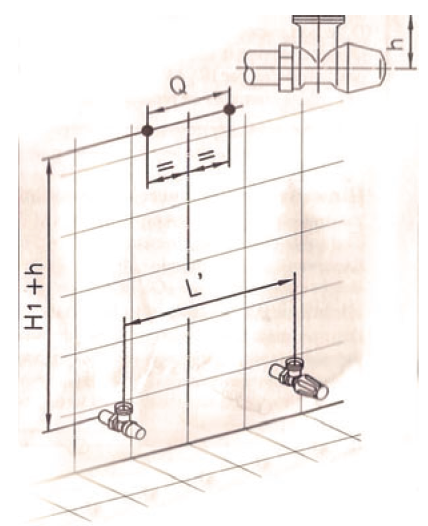
Option 3: The most versatile hydraulic connection is 50 mm along the connector axis (a.k.a. a V–type connection). We recommend this option due to easy installation and the ability to replace the heater with a new one (with different dimensions) in the future. It is undoubtedly the most aesthetic connection.
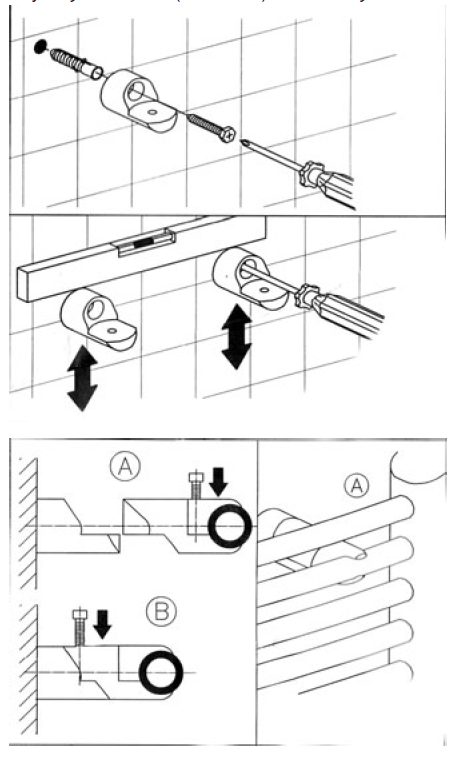
The method of heating device connection depends on whether the lines are guided in wall chases or concealed in the floor. Of great significance is also their type, some of them can only be side–connected, others – side– and bottom–connected. In general, heaters are fixed onto external walls under windows – in the coolest area. Another method is to connect them from the bottom but this requires holes cut in panels/tiles to let the pipes go through. Connection in the middle is an interesting variation on the bottom connection. In this version, fittings are always in the middle of the heater, regardless of its dimensions. This solution is advantageous mostly because the fitter does not have to figure out where exactly the pipe has to be guided out. The supplied bolts and screws are used to mount the consoles (supports) onto the wall. Side connection. The supply pipe (which has to be at the top of the heater) and the return pipe (on the bottom) are guided in wall chases and connected to fittings on the radiator side. Connecting the heater the other way round causes heat output losses of at least 30%. If the height of the heater is greater than 2 m or its length to width ratio is 4:1 or more, a cross connection is used instead of a single side connection by guiding the supply pipe and return pipe along the diagonal of the device. This ensures even distribution of temperature within the radiator.
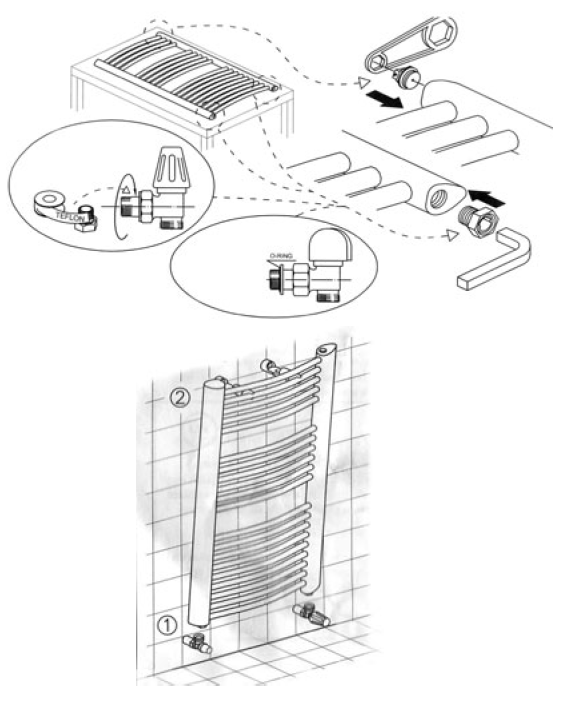
SEQUENCE OF INSTALLATION STEPS
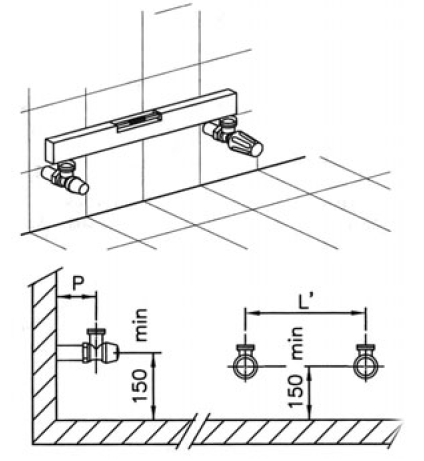
It is recommended that you leave the wrap for installation after you unpack the heater and accessories from the box – it will provide an additional protection against scratching and dirt. You should then make sure that the spacing of connections and fasteners on the wall is the same as in the schematic drawing supplied with the device. Draw the dimensions from the schematic drawing in the area of installation on the wall.
Install central heating valves (supply and return valve) on the lines guided out of the wall. Screw valve tails onto the heater using a spanner (Rothenberger Uni spanner). Hang the heating device thus prepared on consoles (supports). Check the tightness of the installed air vent and other sealing components (e.g. blanking plugs). End the installation process by connecting the heater to the lines using a suitable wrench and sealant (synthetic or natural). You can take the protective wrap off after the installation has been completed.
ADVICE: Before letting water in, make sure that the installation has been correctly assembled and tightened.
PRACTICAL INFORMATION
Wrong connection. If, in case of the bottom connection, the supply pipe and the return pipe are connected the other way round, you can avoid reinstallation by using a special cross connector switching the direction of flowing heating water and thereby making the heater work properly. This connector is available both in straight and angle version. The traditional ladder of vertical tubes (collecting pipes) interconnected via horizontal tubes is connected to the heating system by assembling a thermostatic valve with head together with a supply collecting pipe and assembling a shut–off valve together with the return collecting pipe. In certain models, especially those with unusual shapes or decorative models, vertical collecting pipes are placed side by side (usually at a 5 cm distance). In these cases, it is possible to use combined (duo) connecting sets. Elegant casing incorporates a thermostatic valve and a shut–off valve, with only the head left visible outside.